Wednesday, January 7, 2015


Tuesday, January 6, 2015

Thursday, December 11, 2014
T Mobile APN MMS GPRS WAP Internet Configuration in US And UK

T-Mobile US APN Settings:
T-Mobile APN Settings iPhone:
Below you can find the IPhone apn settings for Tmobile.
Go to -> Settings -> General -> Network ->
Cellular Data Network:
APN: epc.tmobile.com or wap.voicestream.com(Old Phones)
Username:
Password:
MMS:
APN: epc.tmobile.com
Username:
Password:
MMSC: http://mms.msg.eng.t-mobile.com/mms/wapenc
MMS Proxy: 216.155.165.50:8080
MMS Max Message Size: 1048576
MMS UA Prof URL: http://www.apple.com/mms/uaprof.rdf
Below you can find the IPhone apn settings for Tmobile.
Go to -> Settings -> General -> Network ->
Cellular Data Network:
APN: epc.tmobile.com or wap.voicestream.com(Old Phones)
Username:
Password:
MMS:
APN: epc.tmobile.com
Username:
Password:
MMSC: http://mms.msg.eng.t-mobile.com/mms/wapenc
MMS Proxy: 216.155.165.50:8080
MMS Max Message Size: 1048576
MMS UA Prof URL: http://www.apple.com/mms/uaprof.rdf
T-Mobile APN Settings for Android / Nexus/ Samsung Galaxy
T-Mobile APN Settings for Android / Nexus/ Samsung Galaxy:
Go to Settings -> Wireless & Networks -> Mobile Networks -> Acces Point Names and add new APN
Name: T-Mobile
APN: epc.tmobile.com or wap.voicestream.com(Old Phones)
Proxy:
Port:
Username:
Password:
Server:
MMSC: http://mms.msg.eng.t-mobile.com/mms/wapenc
MMS proxy: or 216.155.165.50
MMS Port: or 8080
MCC: 310
MNC:260
APN type: internet + MMS
Authentification Type: None
Go to Settings -> Wireless & Networks -> Mobile Networks -> Acces Point Names and add new APN
Name: T-Mobile
APN: epc.tmobile.com or wap.voicestream.com(Old Phones)
Proxy:
Port:
Username:
Password:
Server:
MMSC: http://mms.msg.eng.t-mobile.com/mms/wapenc
MMS proxy:
MMS Port:
MCC: 310
MNC:260
APN type: internet + MMS
Authentification Type: None
T-Mobile APN Settings for Blackberry:
On your main screen Select -> Options -> Advanced System Settings -> TCP IP
enable APN settings and enter the follwoing settings and save the settings
APN: epc.tmobile.com or wap.voicestream.com (Old apn)
Username: (blank)
Password: (blank)
On your main screen Select -> Options -> Advanced System Settings -> TCP IP
enable APN settings and enter the follwoing settings and save the settings
APN: epc.tmobile.com or wap.voicestream.com (Old apn)
Username: (blank)
Password: (blank)
General Handset Settings for T-Mobile US:
T-Mobile WAP Settings:
Profile name: WAP
APN: epc.tmobile.com
Homepage URL: http://wap.t-zones.com
Bearer: GPRS
Proxy: Disabled
MMSC:http://mms.msg.eng.t-mobile.com/mms/wapenc
IP address:
Port:
GPRS Settings:
Profile name: GPRS
IP address : 216.155.165.050
Port : 8080
APN: wap.voicestream.com
Login ID :
Password :
Short Message Service (SMS)
SMS Email: 10digitmobile@tmomail.net
SMS center: +12063130004
Email center: 500
Voicemail : +18056377243 (1-805-MESSAGE)
T-Mobile WAP Settings:
Profile name: WAP
APN: epc.tmobile.com
Homepage URL: http://wap.t-zones.com
Bearer: GPRS
Proxy: Disabled
MMSC:http://mms.msg.eng.t-mobile.com/mms/wapenc
IP address:
Port:
GPRS Settings:
Profile name: GPRS
IP address : 216.155.165.050
Port : 8080
APN: wap.voicestream.com
Login ID :
Password :
Short Message Service (SMS)
SMS Email: 10digitmobile@tmomail.net
SMS center: +12063130004
Email center: 500
Voicemail : +18056377243 (1-805-MESSAGE)
T-Mobile UK APN Settings:
General Handset Settings for T-Mobile UK:
T-Mobile UK Manual settings for mobile Internet:
Profile name / Connection Name : T-MobileInternet
Homepage : http://www.t-mobile-favourites.co.uk
APN : general.t-mobile.uk
Username : user
Password : tm
For Old Handsets Internet Settings:
Homepage/Message Server : http://www.t-zones.co.uk
Use Proxy : Yes
Proxy IP Address : 149.254.201.132
Connection Security Off
Session Mode : Permanent
Internet Mode : http
APN : general.t-mobile.uk
User Name : user
Password : tm
Account type : PS Data
Prompt password : Off
DNS address : Blank
Response timer: 150 seconds
IP Address Dynamic : Dynamic
Show messages : On
T-Mobile UK Manual settings for MMS / Picture messaging:
Profile name /Connection Name : T-Mobile MMS
Homepage/MMSC : http://mmsc.t-mobile.co.uk:8002
Use proxy : Yes
Proxy IP address : 149.254.201.135
Proxy Port : 8080
Connection Security : Yes
Session Mode : Permanent
Internet Mode : http
Multimedia Reception : Always
Request Read/Delivery Reports : No/No
Accept Advertisements : No
Accept Anonymous : No
Maximum Message Size : max 300 KB
APN : general.t-mobile.uk
User Name : user
Password : tm
Prompt Password : Off
Authentication : PAP
IP Address
Profile name / Connection Name : T-MobileInternet
Homepage : http://www.t-mobile-favourites.co.uk
APN : general.t-mobile.uk
Username : user
Password : tm
For Old Handsets Internet Settings:
Homepage/Message Server : http://www.t-zones.co.uk
Use Proxy : Yes
Proxy IP Address : 149.254.201.132
Connection Security Off
Session Mode : Permanent
Internet Mode : http
APN : general.t-mobile.uk
User Name : user
Password : tm
Account type : PS Data
Prompt password : Off
DNS address : Blank
Response timer: 150 seconds
IP Address Dynamic : Dynamic
Show messages : On
T-Mobile UK Manual settings for MMS / Picture messaging:
Profile name /Connection Name : T-Mobile MMS
Homepage/MMSC : http://mmsc.t-mobile.co.uk:8002
Use proxy : Yes
Proxy IP address : 149.254.201.135
Proxy Port : 8080
Connection Security : Yes
Session Mode : Permanent
Internet Mode : http
Multimedia Reception : Always
Request Read/Delivery Reports : No/No
Accept Advertisements : No
Accept Anonymous : No
Maximum Message Size : max 300 KB
APN : general.t-mobile.uk
User Name : user
Password : tm
Prompt Password : Off
Authentication : PAP
IP Address
ynamic
T-Mobile UK APN Settings for Android:
Name: T-Mobile UK
APN: general.t-mobile.uk
Username: user
Password: tm
MMSC: http://mmsc.t-mobile.co.uk:8002
MMS proxy: 149.254.201.135
MMS port: 8080
MCC: 234
MNC: 30
Name: T-Mobile UK
APN: general.t-mobile.uk
Username: user
Password: tm
MMSC: http://mmsc.t-mobile.co.uk:8002
MMS proxy: 149.254.201.135
MMS port: 8080
MCC: 234
MNC: 30
T-Mobile UK APN Settings for iPhone:
Cellular Data Network:
APN: general.t-mobile.uk
Username: user
Password: tm (or) pass
MMS:
APN: general.t-mobile.uk
Username: user
Password: tm (or) pass
MMSC: http://mmsc.t-mobile.co.uk:8002
MMS Proxy: 149.254.201.135:8080
MMS Max Message Size:
Cellular Data Network:
APN: general.t-mobile.uk
Username: user
Password: tm (or) pass
MMS:
APN: general.t-mobile.uk
Username: user
Password: tm (or) pass
MMSC: http://mmsc.t-mobile.co.uk:8002
MMS Proxy: 149.254.201.135:8080
MMS Max Message Size:
Sunday, December 7, 2014
Repair Samsung C520 Not charging Problem Tested Solution

Repair Samsung C520 Not charging Problem Tested Solution
Monday, November 24, 2014
Nokia N73 On Off Button Problem
Nokia N73 is a Nokia phone that has a feature that is quite complete. The phone is also in great demand in the market that can easily be found in the hands of consumers.
Most problems that occur on the Nokia N73 is a disruption in the software, but it is also possible disturbances of the hardware also occur. One case of hardware malfunction Nokia N73 that I have ever found is the damage to the power button. There are several categories of damage in this section, but the worst is when the copper layer to attach the switch is broken. To overcome this we need a schematic diagram that is useful to guide us find the right path.
To get a schematic diagram of the Nokia N73, you can visit the site Schematic Diagram. There you can download various schematic diagram of mobile phones, especially Nokia. Here is a picture guide to repair damaged power button Nokia N73, please be stored.

Repair Nokia N96 Restart on Nokia Logo
Here I get from other source about how to repair Nokia N96 restart on Nokia logo. There are some method that you can do. Below are the explanation :
First Method :- Make full backup from phone service => IMEI & security => IMEI Rebuild => Back Up RPL all section
- Erase phone with Universal_BB5erase_RAPIDO_MCU.bin and Enable Skip APE (put the file in MCU)
- Flash phone with N95-8GB, RM-320 version 30.0.018 only MCU and PPM files with Enable Skip APE
- Flash phone with N96 Eno file RM-247 Eno. You can download the file here
- Flash phone with version 30.033 N96 RM-247
- Write full back up service => IMEI & security => IMEI rebuild => Write RPL

Second Method :
- Make full back up from phone service => Imei & security => Imei rebuild => back up RPL all section
- Downgrade phone without enable downgrade option
- Repair Simlock service => Imei & security => Simlock => PA SL-2 => Make simlock RPL => repair Simlock
- Repair superdongle service => Imei & security => Imei rebuild => Repair SD
- Sx4 through SuperSD Auth key, and write PM field 1 and 309
- If certificate damaged, repair it by the press recover cert. service => phone test => various => BB5 certificate validation (for check validation certificate)
- Make full backup from phone service => IMEI & security => IMEI Rebuild => Back Up RPL all section
- Repair Simlock service => Imei & security => Simlock => PA_SL2 => Make simlock RPL => Repair simlock
- Repair superdongle service => Imei & security => Imei rebuild => repair SD
- Sx4 through SuperSD Auth Key, and write PM field 1 and 309
- If certificate damaged, repair it by the press recover cert. service => phone test => various => BB5 certificate validation (for check validation certificate)
- Full flash with N96 last version (4 files)
Note : The first method used when the phones part of the security and certificate is completely healthy (Simlock-SD-HWC_CCC-Sec Test is OK).
Sunday, November 23, 2014
Using Ringtone Creator App for BlackBerry
One of the most popular BlackBerry App available today is a product called Ringtone Creator for BlackBerry®. Ringtone Creator for BlackBerry is both a host-based service as
well as a software program that you load to your BlackBerry.
Ringtone Maker also allows you to fine tune the ringtone length and match to the sound you are looking for. Its a great app to make customized ringtones.
My goal when I set out to write this section was to be able to change the ringtone from the
humdrum standard tones available with my 7290 to a recognizable tune that everyone around
me will love (or hate) to hear.
Easily create your own Ringtones directly from your BlackBerry!!! Simply select an MP3, mark the start and end points and click to save your own Ringtone.
Its that simple! Using Ringtone Creator for BlackBerry - Cut MP3 Music Files and make your own Ringtone Alerts - Create and Share ringtones with your friends. Now Ringtone Creator update Version 3.6.0.
Ringtone Creator Features :

Read More..
well as a software program that you load to your BlackBerry.
Ringtone Maker also allows you to fine tune the ringtone length and match to the sound you are looking for. Its a great app to make customized ringtones.
My goal when I set out to write this section was to be able to change the ringtone from the
humdrum standard tones available with my 7290 to a recognizable tune that everyone around
me will love (or hate) to hear.
Easily create your own Ringtones directly from your BlackBerry!!! Simply select an MP3, mark the start and end points and click to save your own Ringtone.
Its that simple! Using Ringtone Creator for BlackBerry - Cut MP3 Music Files and make your own Ringtone Alerts - Create and Share ringtones with your friends. Now Ringtone Creator update Version 3.6.0.
Ringtone Creator Features :
- Advanced fine tuning screen to make your ringtones sound really great!
- Simply choose a song, select a start and end point and save your new Ringtone file
- Ringtones can be stored on your BlackBerry or media card
- Use any songs stored in your BlackBerry or on a media card to create your Ringtones
- No computer software is required
- No subscription or monthly fees
Friday, November 21, 2014
Nokia Lumia 925t rm 955 Boot Repair File

Nokia Lumia 925t rm-955 Boot Repair File
Nokia Lumia 925T Boot Repair File Download
What Is The Boot Repair
The Boot Repair Boot Is The Primary Section For The Mobile phone Software
Boot Is Boot-loader the starting on the your mobile phone operating system
without boot cannot be start your mobile phone operating system
if the bootloader corrupted ?
the mobile phone is dead cannot be power on
What Is The Boot RepairThe Boot Repair Boot Is The Primary Section For The Mobile phone Software
Boot Is Boot-loader the starting on the your mobile phone operating system
without boot cannot be start your mobile phone operating system
if the bootloader corrupted ?
the mobile phone is dead cannot be power on
the solution this problem first check your mobile phone bootloader in the dead condition
The Boot Loder File is
http://www.4shared.com/file/9rG_QrOrce/LUMIA_925T_RM-955_BIG_BOOT.html
Nokia 6700s slide keypad backlight LED solution

Nokia 6700s slide keypad back light LED solution
Thursday, November 20, 2014
Nokia 2600 classic keypad ways track Keypad is not working solution

Nokia 2600 classic keypad ways track Keypad is not working solution
Nokia 114 110 Lcd Jumper Solution

Nokia 110 Display Track ways
Nokia 114 Display Track ways
Nokia 114 Lcd Jumper Solution
Nokia 114 White Display Problem
Nokia 110 Lcd Jumper Solution
Having nokia 114 White Display Problem, I have marked display ways jumper points in this diagram. Only make these jumpers if necessary like if any of the prints are busted. If the LCD connector is in good shape replace the LCD itself.
Tested By musharraf Ali
Your Own Risk we are not responsible if these solutions may cause any harm to your Device.

Wednesday, November 19, 2014
Samsung E250 Limited Service Local Mode Contact Service Jumper Solution

Samsung E250 Limited Service Local Mode Contact Service Jumper Solution

HTC One X How to Create Folder
Home Screen on HTC sometimes filled with app icons scattered. In fact, sometimes there are in some Lcd Home Screen. We better be grouped in one folder shortcut applications, so not too crowded display its Home Screen. Here are the steps
1. To create a new folder, tap and hold an app then drag it on top of another application. This will create a folder containing both apps.
2. Tap the folder to open it.
3. Tap the "Add" icon depicted as a "+" symbol.
4. Select the apps you wish to add in the new folder.
5. Press "Add".
Suppose there is an error in the name of the folder, and would like it removed, tap and drag the folder again and drag it to the trash icon. and repeat the steps above
Read More..
1. To create a new folder, tap and hold an app then drag it on top of another application. This will create a folder containing both apps.
2. Tap the folder to open it.
3. Tap the "Add" icon depicted as a "+" symbol.
4. Select the apps you wish to add in the new folder.
5. Press "Add".
Suppose there is an error in the name of the folder, and would like it removed, tap and drag the folder again and drag it to the trash icon. and repeat the steps above

Tuesday, November 18, 2014
Rooting I9505XXUFNB9 Android 4 4 2 KitKat Firmware
Download CF-Auto-Root for Galaxy S4 I9505 and extract the Zip file: CF-Auto-Root-jflte-jfltexx-gti9505.zip.zip
Read More..
- Download Odin 3.09 and extract the Zip file: Odin3_V3.09.Zip
- Now, Switch off your phone and boot Galaxy S4 I9505 into Download Mode by pressing and holding the Volume Down+Home+Power buttons together (long press until the boot Lcd appear), now press Volume Up key to proceed to Download Mode.
- Run the Odin3 v3.09.exe file as an administrator (Right click on the .exe file and click on Run as administrator)
- Now connect your Galaxy S4 I9505 to your computer via USB cable
- In Odin3 Lcd, you should see a COM Port number like “0:[COM7]” at ID:COM section and “Added!” text at the message box. This means your device has been detected by Odin3.
- Make sure that, only the “Auto Reboot” and “F. Reset Time” options are checked.
- Now, click on the AP button and select the CF-Auto-Root-jflte-jfltexx-gti9505.zip.tar.md5 file.
- Finally, click on the Start button to begin the rooting process, wait few moments.
- Once completed, you would see “PASS!” message in ID:COM port having green background
- Your phone should automatically reboot after completion
- You can now disconnect your phone from computer
- Finish
Nokia 1100 Handfree Problem Solution By Jumpers
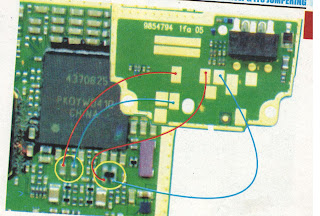
Nokia 1100 Handfree Problem Solution By Jumpers : Hardware Repairing Solution
Nokia Lumia 710 Search Home Back Button Ways

Nokia Lumia 710 Search Home Back Button Ways
Monday, November 17, 2014
HTC One X How To Change Hboot
HTC Incredible S , product names VIVO very nice part of the smart phone , the design in my opinion is among the BEST HTC products available . I have so many types of ROM Flashing into this VIVO and everything went well . S - offed by AlpharevX ( Public Beta Version ) .
on December 5, 2011 , I had time to play with and accidentally send the wrong vivo_hboot.img the phone S - ON and turn into S - ON , so far only able to boot into HBOOT and fastboot : D look at this : HTC Incredible S Vivo
Referring to fellow board android much discussion on the NET , and especially I went to the XDA FORUMS , devs and users are advised to flash the RUU ( Rom Upgrade Utility ) with MAINVERSION right , well this is me on the phone mainver obtained with fastboot command :
root @ ubuntu :/ home / x / adb -tools # . / fastboot getvar all
( bootloader ) version : 0.5
( bootloader ) version - bootloader : 1.09.0000
( bootloader ) version - baseband : 3805.09.03.27_M
( bootloader ) version - cpld : None
( bootloader ) version - microp : None
( bootloader ) version - play : 2.32.1010.1
( bootloader ) serialno : HT13ATD00430
( bootloader ) imei : 355,301,042,004,294
( bootloader ) product : vivo
( bootloader ) platform : HBOOT - 7630
( bootloader ) modelid : PG3213000
( bootloader ) cidnum : HTC__044
( bootloader ) battery - status : good
( bootloader ) battery -voltage : 3992mV
( bootloader ) partition - layout : Generic
( bootloader ) security : on
( bootloader ) build- mode : SHIP
( bootloader ) boot - mode : fastboot
( bootloader ) commitno - bootloader : dirty - 51a64cbe
( bootloader ) hbootpreupdate : 12
( bootloader ) gencheckpt : 0
Since I am far from the android dev skills , but Im excited and curriois users . I have opinions , I am faced with a complex problem that the current state of the phone :
The main problem
- Play version : 2.32.1010.1 : Owned bill KT KR 2.32.1010.1
cidnum : HTC__044 : Owned Asia WWE RUU
security : on
small problem
Version - baseband : 3805.09.03.27_M
hbootpreupdate : 12
commitno - bootloader : dirty - 51a64cbe
profit
Version - bootloader : 1.09.0000
theorical Solutions
I must have the bill STOCK ROM Main Version 2.32.1010.1 for HTC___044 CID with hbootpreupdate : 12 . NOT AVAILABLE thing so far .
What Ive done
Using the Gold Card method HBOOT
1.Download 2.32.1010.1 bill . ROM extracted it, renamed to PG32IMG.zip put rom Goldcard , failed to update the message on the phone : Failed CID ( This should not happen on my Goldcard may not have a good GoldCard . ) .
2.Edited standard rom android - info.txt on :
default android -info file
modelid : PG3213000
cidnum : KT___901
mainver : 2.32.1010.1
hbootpreupdate : 13
Edited for
edited the android -info file
modelid : PG3213000
cidnum : KT___901
cidnum : HTC__004 ( edited )
mainver : 2.32.1010.1
hbootpreupdate : 12
Put back all files to PG32IMG.zip to Goldcard and update HBOOT CID Fail not to come , but NOTHING HAPPENED on the phone ( No Update / Install ROM )
In this case I just remembered : Goldcard method can only be applied to GOAL UPDATE , meaning GoldCard will work to install the ROM but avoid Checking CID HIGH . In simple you have a cell phone and rom European stock from retailers , but you want high rom that is NOT AVAILABLE for the European version , then you should flash Rom Gold Card with Asia or other higher versions .
fastboot method
1.Boot to fastboot mode fastboot + adb . Standard flashing rom.zip 2.32.1010.1 ending with :
x @ ubuntu ~ / adb -tools $ sudo . / fastboot devices
[ sudo ] password for x :
HT13ATD00430 fastboot
x @ ubuntu ~ / adb -tools $ sudo . / fastboot erase cache
erasing cache ...
OKAY [ 0.110s ]
finished . total time : 0.110s
x @ ubuntu ~ / adb -tools $ sudo . / fastboot oem rebootRUU
...
OKAY [ 0.170s ]
finished . total time : 0.170s
x @ ubuntu ~ / adb -tools $ sudo . / fastboot flash zip rom * . zip
sending zip ( 262360 KB ) ...
OKAY [ 43.811s ]
writing zip ...
( bootloader ) Adopting the signature contained in this image ...
( bootloader ) signature checking ...
( bootloader ) zip header checking ...
( bootloader ) zip the info parsing ...
( bootloader ) checking model of ID ...
( bootloader ) checking custom ID ...
FAILED ( remote : 42 custom id check fail )
finished . total time : 84.150s
2.Tricked by android - info.txt file edited to match the cid num
edited the android -info file
modelid : PG3213000
cidnum : KT___901
cidnum : HTC__004 (this edited file only)
mainver : 2.32.1010.1
hbootpreupdate : 13
boot into fastboot again
x @ ubuntu ~ / adb -tools $ sudo . / fastboot devices
HT13ATD00430 fastboot
x @ ubuntu ~ / adb -tools $ sudo . / fastboot erase cache
erasing cache ...
OKAY [ 0.110s ]
finished . total time : 0.110s
x @ ubuntu ~ / adb -tools $ sudo . / fastboot oem rebootRUU
...
OKAY [ 0.168s ]
finished . total time : 0.168s
x @ ubuntu ~ / adb -tools $ sudo . / fastboot flash zip rom * . zip
sending zip ( 258814 KB ) ...
OKAY [ 43.757s ]
writing zip ...
( bootloader ) signature checking ...
FAILED ( remote : 12 signature verify fail )
finished . total time : 77.417s
Further 3.Trick edit on android -info file
edited the android -info file
modelid : PG3213000
cidnum : KT___901
cidnum : HTC__004 ( edited )
mainver : 2.32.1010.1
hbootpreupdate : 12 ( edited )
fastboot boot info
x @ ubuntu ~ / adb -tools $ sudo . / fastboot devices
HT13ATD00430 fastboot
x @ ubuntu ~ / adb -tools $ sudo . / fastboot erase cache
erasing cache ...
OKAY [ 0.110s ]
finished . total time : 0.111s
x @ ubuntu ~ / adb -tools $ sudo . / fastboot oem rebootRUU
...
OKAY [ 0.168s ]
finished . total time : 0.168s
x @ ubuntu ~ / adb -tools $ sudo . / fastboot flash zip rom * . zip
sending zip ( 258814 KB ) ...
OKAY [ 43.785s ]
writing zip ...
( bootloader ) signature checking ...
FAILED ( remote : 12 signature verify fail )
finished . total time : 77.446s
comment
First attemp : after : FAILED ( remote : 42 custom id check fail )
Second attemp : has : FAILED ( remote : 12 signature verify fail )
Attenp Third : after : FAILED ( remote : 12 signature verify fail )
So I NEED to find out what FAILED ( remote : 12 signature verify fail ) and how to mengeatasinya
Following Steps You Should Do :
Solve : If the HBOOT and fastboot Stuck In Incredible S
Incredible S Vivo
Of Status STUCK after some surfing and received " advice " friends via email . I have made sure that only the gold card would help . Looks like I made a mistake in creating the gold card previously , repeated making gold card , but it always fails with the message " wrong CID ... " which should NOT HAPPEN with Gold card . After looking around , I think the SD - CARD has some problems . I found the old 2GB micro sd card , sd card to flash old phones 2.32.1010.1 stuck with the stock ROM ( Korea Olleh ROM ) ... :-)
Gold Card Issue
There are many guides HOW TO MAKE A GOLD CARD in ubuntu linux . But what I found on the NET are always needed adb and phone . I still do not understand , how to get a sd card by using CARD READER CID . S Vivo incredble least I have been out of stuck : D and continued for days with cute Korean ROM
Read More..
on December 5, 2011 , I had time to play with and accidentally send the wrong vivo_hboot.img the phone S - ON and turn into S - ON , so far only able to boot into HBOOT and fastboot : D look at this : HTC Incredible S Vivo
Referring to fellow board android much discussion on the NET , and especially I went to the XDA FORUMS , devs and users are advised to flash the RUU ( Rom Upgrade Utility ) with MAINVERSION right , well this is me on the phone mainver obtained with fastboot command :
root @ ubuntu :/ home / x / adb -tools # . / fastboot getvar all
( bootloader ) version : 0.5
( bootloader ) version - bootloader : 1.09.0000
( bootloader ) version - baseband : 3805.09.03.27_M
( bootloader ) version - cpld : None
( bootloader ) version - microp : None
( bootloader ) version - play : 2.32.1010.1
( bootloader ) serialno : HT13ATD00430
( bootloader ) imei : 355,301,042,004,294
( bootloader ) product : vivo
( bootloader ) platform : HBOOT - 7630
( bootloader ) modelid : PG3213000
( bootloader ) cidnum : HTC__044
( bootloader ) battery - status : good
( bootloader ) battery -voltage : 3992mV
( bootloader ) partition - layout : Generic
( bootloader ) security : on
( bootloader ) build- mode : SHIP
( bootloader ) boot - mode : fastboot
( bootloader ) commitno - bootloader : dirty - 51a64cbe
( bootloader ) hbootpreupdate : 12
( bootloader ) gencheckpt : 0
Since I am far from the android dev skills , but Im excited and curriois users . I have opinions , I am faced with a complex problem that the current state of the phone :
The main problem
- Play version : 2.32.1010.1 : Owned bill KT KR 2.32.1010.1
cidnum : HTC__044 : Owned Asia WWE RUU
security : on
small problem
Version - baseband : 3805.09.03.27_M
hbootpreupdate : 12
commitno - bootloader : dirty - 51a64cbe
profit
Version - bootloader : 1.09.0000
theorical Solutions
I must have the bill STOCK ROM Main Version 2.32.1010.1 for HTC___044 CID with hbootpreupdate : 12 . NOT AVAILABLE thing so far .
What Ive done
Using the Gold Card method HBOOT
1.Download 2.32.1010.1 bill . ROM extracted it, renamed to PG32IMG.zip put rom Goldcard , failed to update the message on the phone : Failed CID ( This should not happen on my Goldcard may not have a good GoldCard . ) .
2.Edited standard rom android - info.txt on :
default android -info file
modelid : PG3213000
cidnum : KT___901
mainver : 2.32.1010.1
hbootpreupdate : 13
Edited for
edited the android -info file
modelid : PG3213000
cidnum : KT___901
cidnum : HTC__004 ( edited )
mainver : 2.32.1010.1
hbootpreupdate : 12
Put back all files to PG32IMG.zip to Goldcard and update HBOOT CID Fail not to come , but NOTHING HAPPENED on the phone ( No Update / Install ROM )
In this case I just remembered : Goldcard method can only be applied to GOAL UPDATE , meaning GoldCard will work to install the ROM but avoid Checking CID HIGH . In simple you have a cell phone and rom European stock from retailers , but you want high rom that is NOT AVAILABLE for the European version , then you should flash Rom Gold Card with Asia or other higher versions .
fastboot method
1.Boot to fastboot mode fastboot + adb . Standard flashing rom.zip 2.32.1010.1 ending with :
x @ ubuntu ~ / adb -tools $ sudo . / fastboot devices
[ sudo ] password for x :
HT13ATD00430 fastboot
x @ ubuntu ~ / adb -tools $ sudo . / fastboot erase cache
erasing cache ...
OKAY [ 0.110s ]
finished . total time : 0.110s
x @ ubuntu ~ / adb -tools $ sudo . / fastboot oem rebootRUU
...
OKAY [ 0.170s ]
finished . total time : 0.170s
x @ ubuntu ~ / adb -tools $ sudo . / fastboot flash zip rom * . zip
sending zip ( 262360 KB ) ...
OKAY [ 43.811s ]
writing zip ...
( bootloader ) Adopting the signature contained in this image ...
( bootloader ) signature checking ...
( bootloader ) zip header checking ...
( bootloader ) zip the info parsing ...
( bootloader ) checking model of ID ...
( bootloader ) checking custom ID ...
FAILED ( remote : 42 custom id check fail )
finished . total time : 84.150s
2.Tricked by android - info.txt file edited to match the cid num
edited the android -info file
modelid : PG3213000
cidnum : KT___901
cidnum : HTC__004 (this edited file only)
mainver : 2.32.1010.1
hbootpreupdate : 13
boot into fastboot again
x @ ubuntu ~ / adb -tools $ sudo . / fastboot devices
HT13ATD00430 fastboot
x @ ubuntu ~ / adb -tools $ sudo . / fastboot erase cache
erasing cache ...
OKAY [ 0.110s ]
finished . total time : 0.110s
x @ ubuntu ~ / adb -tools $ sudo . / fastboot oem rebootRUU
...
OKAY [ 0.168s ]
finished . total time : 0.168s
x @ ubuntu ~ / adb -tools $ sudo . / fastboot flash zip rom * . zip
sending zip ( 258814 KB ) ...
OKAY [ 43.757s ]
writing zip ...
( bootloader ) signature checking ...
FAILED ( remote : 12 signature verify fail )
finished . total time : 77.417s
Further 3.Trick edit on android -info file
edited the android -info file
modelid : PG3213000
cidnum : KT___901
cidnum : HTC__004 ( edited )
mainver : 2.32.1010.1
hbootpreupdate : 12 ( edited )
fastboot boot info
x @ ubuntu ~ / adb -tools $ sudo . / fastboot devices
HT13ATD00430 fastboot
x @ ubuntu ~ / adb -tools $ sudo . / fastboot erase cache
erasing cache ...
OKAY [ 0.110s ]
finished . total time : 0.111s
x @ ubuntu ~ / adb -tools $ sudo . / fastboot oem rebootRUU
...
OKAY [ 0.168s ]
finished . total time : 0.168s
x @ ubuntu ~ / adb -tools $ sudo . / fastboot flash zip rom * . zip
sending zip ( 258814 KB ) ...
OKAY [ 43.785s ]
writing zip ...
( bootloader ) signature checking ...
FAILED ( remote : 12 signature verify fail )
finished . total time : 77.446s
comment
First attemp : after : FAILED ( remote : 42 custom id check fail )
Second attemp : has : FAILED ( remote : 12 signature verify fail )
Attenp Third : after : FAILED ( remote : 12 signature verify fail )
So I NEED to find out what FAILED ( remote : 12 signature verify fail ) and how to mengeatasinya
Following Steps You Should Do :
Solve : If the HBOOT and fastboot Stuck In Incredible S
Incredible S Vivo
Of Status STUCK after some surfing and received " advice " friends via email . I have made sure that only the gold card would help . Looks like I made a mistake in creating the gold card previously , repeated making gold card , but it always fails with the message " wrong CID ... " which should NOT HAPPEN with Gold card . After looking around , I think the SD - CARD has some problems . I found the old 2GB micro sd card , sd card to flash old phones 2.32.1010.1 stuck with the stock ROM ( Korea Olleh ROM ) ... :-)
Gold Card Issue
There are many guides HOW TO MAKE A GOLD CARD in ubuntu linux . But what I found on the NET are always needed adb and phone . I still do not understand , how to get a sd card by using CARD READER CID . S Vivo incredble least I have been out of stuck : D and continued for days with cute Korean ROM
Subscribe to:
Posts (Atom)
