Showing posts with label on. Show all posts

Monday, November 24, 2014

Nokia N73 On Off Button Problem

Nokia N73 is a Nokia phone that has a feature that is quite complete. The phone is also in great demand in the market that can easily be found in the hands of consumers.

Most problems that occur on the Nokia N73 is a disruption in the software, but it is also possible disturbances of the hardware also occur. One case of hardware malfunction Nokia N73 that I have ever found is the damage to the power button. There are several categories of damage in this section, but the worst is when the copper layer to attach the switch is broken. To overcome this we need a schematic diagram that is useful to guide us find the right path.

To get a schematic diagram of the Nokia N73, you can visit the site Schematic Diagram. There you can download various schematic diagram of mobile phones, especially Nokia. Here is a picture guide to repair damaged power button Nokia N73, please be stored.
Read More..

Repair Nokia N96 Restart on Nokia Logo

Here I get from other source about how to repair Nokia N96 restart on Nokia logo. There are some method that you can do. Below are the explanation :
First Method :
  1. Make full backup from phone service => IMEI & security => IMEI Rebuild => Back Up RPL all section
  2. Erase phone with Universal_BB5erase_RAPIDO_MCU.bin and Enable Skip APE (put the file in MCU)
  3. Flash phone with N95-8GB, RM-320 version 30.0.018 only MCU and PPM files with Enable Skip APE
  4. Flash phone with N96 Eno file RM-247 Eno. You can download the file here
  5. Flash phone with version 30.033 N96 RM-247
  6. Write full back up service => IMEI & security => IMEI rebuild => Write RPL

Second Method :
  1. Make full back up from phone service => Imei & security => Imei rebuild => back up RPL all section
  2. Downgrade phone without enable downgrade option
  3. Repair Simlock service => Imei & security => Simlock => PA SL-2 => Make simlock RPL => repair Simlock
  4. Repair superdongle service => Imei & security => Imei rebuild => Repair SD
  5. Sx4 through SuperSD Auth key, and write PM field 1 and 309
  6. If certificate damaged, repair it by the press recover cert. service => phone test => various => BB5 certificate validation (for check validation certificate)
Third Method :
  1. Make full backup from phone service => IMEI & security => IMEI Rebuild => Back Up RPL all section
  2. Repair Simlock service => Imei & security => Simlock => PA_SL2 => Make simlock RPL => Repair simlock
  3. Repair superdongle service => Imei & security => Imei rebuild => repair SD
  4. Sx4 through SuperSD Auth Key, and write PM field 1 and 309
  5. If certificate damaged, repair it by the press recover cert. service => phone test => various => BB5 certificate validation (for check validation certificate)
  6. Full flash with N96 last version (4 files)
Note : The first method used when the phones part of the security and certificate is completely healthy (Simlock-SD-HWC_CCC-Sec Test is OK).
Read More..

Saturday, November 8, 2014

Nokia 2700 classic Power ON OFF Key Solution Switch button jumper ways solution

Heres the solution  that may help fix and repair Nokia 2700 classic Power problem. This solution is for Nokia 2700 classic that shows charging indication but doesnt  get On or power up when pressing the power key switch button.  Although this solution came late but  still there are many who are looking and requesting  this solution.
Nokia 2700C Power On -Off key Switch Line Tracks
There is line test spots near the Keypad filter IC that can be easily check the power/ end key line paths, just apply a jumper wire if that line is open or cut.
If the said line spots is okay, you may need to check and replace the upper Keypad Filter IC.
Read More..

Friday, November 7, 2014

Nokia 111 No Power On with Battery Problem Solution

1-Nokia 111 is not getting power on with battery.
2-Nokia 111 is dead and not getting power on with battery.
3-But it can be switch on with direct power supply of 4v.


Tools:-
To solve this problem you should have
1-Any electronics cleaner.
2-Hot Air Machine.
3-Solding Iron.
4-And same mother board if a few components required.
Solution:-
1-Check Nokia 111 with new battery and try to switch on.
2-If it can not be power on with battery then check with Power Supply.
3-Disassamble Nokia 111 and look at mother board very carefully.
4-If there is some rust or carbon on board then clean it with electronics cleaner.
5-Apply hot air with Hot air gun. Here should not be much heat because it can harm you and Mobile
Phone.
6-Check Mobile phone with battery if it can be power on with it.
7-If not working with above process then change these parts as shown in above diagram.
Warnings:-
1-Do not apply to much heat it can be harm for your skin and mobile.
2-Do not apply to much cleaner it can be cause of rust or carbon if you do not make your phone dry.
for more detail and new tips and tricks about cellphone service problem keep visiting this page we will update daily this blog timely with other mobile solution.
Read More..

Wednesday, November 5, 2014

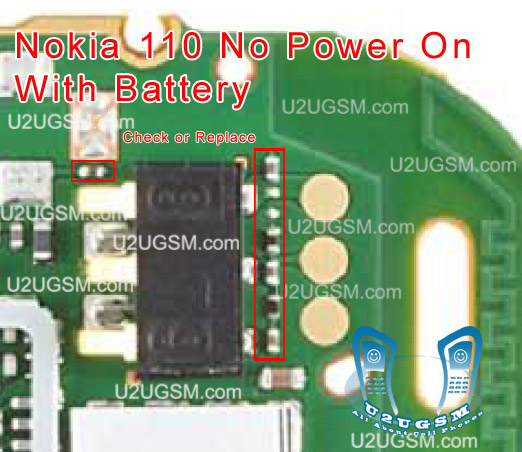
Nokia 110 No Power On with Battery Problem Solution

1-Nokia 110 is not getting power on with battery.
2-Nokia 110 is dead and not getting power on with battery.
3-But it can be switch on with direct power suplly of 4v.


Tools:-
To solve this problem you should have
1-Any electronics cleaner.
2-Hot Air Machine.
3-Solding Iron.
4-And same mother board if a few components required.
Solution:-
1-Check Nokia 110 with new battery and try to switch on.
2-If it can not be power on with battery then check with Power Supplu.
3-Disassamble Nokia 110 and look at mother board very carefully.
4-If there is some rust or carbon on board then clean it with electronics cleaner.
5-Apply hot air with Hot air gun. Here should not be much heat because it can harm you and Mobile
Phone.
6-Check Mobile phone with battery if it can be power on with it.
7-If not working with above process then change these parts as shown in above diagram.
Warnings:-
1-Do not apply to much heat it can be harm for your skin and mobile.
2-Do not apply to much cleaner it can be cause of rust or carbon if you do not make your phone dry.
for more detail and new tips and tricks about cellphone service problem keep visiting this page we will update daily this blog timely with other mobile solution.
Read More..

Tuesday, November 4, 2014

Nokia Asha 200 Power Button On Off Switch Not Working Problem

if you have a Nokia Asha 200 dead they may can have a power switch on off problem so please in first step plug in a charger and if Nokia Asha 200 is charging proper and well but not getting on it means the main problem can be power switch on off fault.


so for this you have to change power switch button on off button in Nokia Asha 200 if prints are also damge in Nokia Asha 200 for on off button then here is a full path and track for power switch button in diagram that is attached with this post so check all this path and track for power switch on off button in Nokia Asha 200 and if any of these links broken than make these jumpers as shown in diagram with red line while blue color is indicated for ground print.
for more detail and new tips and tricks about this problem keep visiting this page we will update it timely with new diagrams.some related post are also given bellow you can read them also for more information.
Read More..

Monday, October 27, 2014

Nokia 1280 ON OFF Power Key Jumper Ways

Heres a full solution for a damaged Nokia 1280 ON and OFF key problem. This problem may result to unable the device to turns on but it shows charging indication when the battery charger is being plug-in.

The solution below shows the entire Nokia 1280 ON/OF key connection tracks which can be used for easy troubleshooting.

Nokia 1280 On-Off Jumper Ways and Line Tracks
nokia

If the Nokia 1280 On-Off key may not working, you can trace its connection line paths as shown on solution above. Just apply a jumper wire if the line tracks is open or cut.
Read More..

Wednesday, October 22, 2014

Blackberry 8520 hange on blackberry logo 100 tested

blackberry 8520 hange on blackberry logo only solution,blackberry only show blackberry not power on solution, blackberry,8520 hang problem many time update phone for firmware but not solve problem try my solution im solve many phone this way try my solution i hope solve your phone blackberry only hange logo done solution here,
blackberry 8520 cross battery Solution 100% tested solution 
see my solution only red logo ic fast reheat not solve try secound step
change only red logo ic i hope solve your phone 100% .
If U need 100% working solution have this try and solve hang problem.
Read More..

Wednesday, October 15, 2014

How to Screen Mirror Sony Xperia Z2 Tablet to Show the Screen on a TV


The Screen Mirroring will allow you to show the Lcd of your device on a TV or other large display without using a cable connections. It uses the Wi-Fi Direct technology that create a wireless connection between two devices. You can also use this feature to listen to music from your phone via the TVs speakers.


How to mirror the Lcd of your tablet on a TV:

1. First you need to turn on the Lcd mirroring function on your TV. Just follow the instructions in the User Guide of your TV.

2. From your Home Lcd, tap on the Menu icon 

3. Select on Settings, and tap Xperia™.

4. Choose Screen mirroring.

5. Tap to turn on the Screen mirroring and select a device.

Note: The TV that you want to connect with must support Lcd mirroring for the above described functionality to work. If it does not support, then you can try the Throw feature. Go to Settings Throw feature.


Read More..

Monday, October 13, 2014

N96 restart on nokia logo 100 solution

First method is that phones part of the Security and Certificate is completely Healthy.(Simlock-SD-HWC_CCC-Sec Test is OK)


First method:

1 - Make full Backup from Phone Service-> Imei & Security-> IMEI Rebuild-> BackupRPL All Section
2 - Erase phone with Universal_BB5Erase_RAPIDO_MCU.bin and Enable Skip APE (put the file in MCU)
3 - Flash phone with N95-8GB.RM-320 Version 30.0.018 only MCU and PPM files with Enable Skip APE
4 - Flash phone with N96 Eno File rm247_ENO_x_2010wk99v99.099_by_Y.P.Y
5 - Flash phone with Version 30.033 N96 RM-247
6 - Write Full Backup Service-> Imei & Security-> IMEI Rebuild-> Write RPL


Second method:

1 - Make full Backup from Phone Service-> Imei & Security-> IMEI Rebuild-> BackupRPL All Section
2 - Downgrade phone Without Enable Downgrade Option
3 - Repair Simlock Service-> Imei & Security-> Simlock-> PA_SL2 -> Make Simlock RPL-> Repair Simlock
4 - Repair SuperDongle Service-> Imei & Security-> IMEI Rebuild-> Repair SD
5- Sx4 through SuperSD Auth key, and write PM Field 1 and 309
6 - if Certificate damaged Repair it by the press Recover Cert. Service-> PhoneTest-> Various-> BB5 Certificate Validation (For Check Validation Cert)

Third method:

1 - Make full Backup from Phone Service-> Imei & Security-> IMEI Rebuild-> BackupRPL All Section
2 - Repair Simlock Service-> Imei & Security-> Simlock-> PA_SL2 -> Make Simlock RPL-> Repair Simlock
3 - Repair SuperDongle Service-> Imei & Security-> IMEI Rebuild-> Repair SD
4- Sx4 through SuperSD Auth key, and write PM Field 1 and 309
5 - if Certificate damaged Repair it by the press Recover Cert. Service-> PhoneTest-> Various-> BB5 Certificate Validation (For Check Validation Cert)
6 - Full flash with N96 last version (4 files)
by
sainesh
Read More..

Thursday, September 25, 2014

How to Manually Change Time Date on Sony Xperia Z1

To manually set the date:

1. On your Home Lcd, tap the .
2. Select Settings, then tap Date & Time.
3. You need to uncheck the Automatic date & time. If it is set to automatic.
4. Then tap on Set date, and adjust the date by scrolling up and down.
5. To confirm the changes, tap Done.

To manually set the time:

1. On your Home Lcd, tap the .
2. Select Settings, then tap Date & Time.
3. You need to uncheck the Automatic date & time. If it is set to automatic.
4. Then tap on Set time, and adjust the time by scrolling up and down.
5. To confirm the changes, tap Done.

If you want to change the timezone:

1. On your Home Lcd, tap the .
2. Select Settings, then tap Date & Time.
3. You need to uncheck the Automatic date & time. If it is set to automatic.
4. Then tap on Select time zone.
5. Find your preferred time zone in the option.


Read More..

How To Root I9195XXUBML4 Android 4 2 2 Jelly Bean Firmware on Galaxy S4 mini I9195 Guide

An easy to follow guide to root the Galaxy S4 Mini I9195 which runs on Android 4.2.2 Jelly Bean XXUBML4 available on Android right now. If you want to enjoy the apps available in the Play Store with [Root] in the suffix or prefix then you must first eradicate the Samsung Galaxy Mini GT - I9195 S4 you. Roots are equipped with a variety of benefits including the ability to access and modify the file system, allowing the CPU or GPU overclocking and more


To eradicate the S4 Galaxy Mini I9195 which runs on Android 4.2.2 firmware XXUBML4 Jelly Bean, first of all we are going to install ClockworkMod Recovery 6.0.3.7 and then flash a custom recovery using a rootkit.

WarningThis tutorial is only for Galaxy S4 mini GT-I9195. Don’t try this guide on any other Android device. Also, we are not responsible for any damage caused due to the instruction given in this page. Try this at your own risk. However, it is very unlikely that your device will be damaged if you follow all the instructions as it is which are mentioned in procedure. Rooting also void your manufacturer warranty.
Pre Requisites:
Though rooting usually not harmful for internal memory data but we recommend to back up your data first before proceeding to avoid any uncomfortable situation such as bootloop fix.
1. Backup your device data. You can follow our ultimate backup guide.
2.  Make sure your device have at least 60% battery power. You can install an app like Battery Notifier BT Free on your Android device to check it easily.
3. You already have USB Driver Installed for Galaxy S4 mini GT-I9195 in your PC. Download USB Drivers
4. Make sure USB Debugging is enabled otherwise you won’t able to transfer file between PC and Galaxy S4 mini GT-I9195. Guide
If you done what we stated above then you good to go for installing ClockworkMod recovery 6.0.3.7 on Galaxy S4 mini I9195 and then root it using custom recovery.

How To Root I9195XXUBML4 Android 4.2.2 Jelly Bean On Galaxy S4 mini GT-I9195 Manually

  1. Download Odin v3.09recovery-clockwork-6.0.3.7-serranoltexx.tar.zip and S4Mini_RootKit_v1.zip.
  2. Copy only S4Mini_RootKit_v1.zip to your Galaxy S4 mini GT-I9195 SD card.
  3. Extract Odin zip file and you will get Odin3 v3.09.exe along with few other files. Now extract recovery-clockwork-6.0.3.7-serranoltexx.tar.zip and you should get recovery-clockwork-6.0.3.7-serranoltexx.tar.md5.
  4. Power off your Android device. Wait 5-6 seconds for vibration to confirm complete switch off.
  5. Now, put the Galaxy S4 mini GT-I9195  in Download Mode by pressing and holding down the Home Volume Down button together while pressing the Power button. A warning Lcd will come up; press Volume Up button to enter Download Mode.
  6. Now run Odin3 v3.09.exe (see Step 3) as an Administrator because Admin privileges is required to complete the process smoothly (only applicable Windows Vista and higher).
  7. Now connect your device to your PC using USB cable. An “Added!!” massage will appear in Odin’s message box. If you don’t get the same then you should try another USB port (try USB port located in back in your desktop PC). If that too don’t work then you should reinstall the driver. If you successfully see the “Added!!” message in Odin then you are ready to go in next step. You should also see COM port with a number in Yellow if you successfully added your device.
  8. Click the AP Button, and select that recovery-clockwork-6.0.3.7-serranoltexx.tar.md5 file that you get in Step 3.
  9. In Odin window, make sure only Auto Reboot and F. Reset Time checkboxes are selected.
  10. Double check everything that we mentioned in Step 8 & Step 9 above. Now, once satisfied hit the START button to begin the flashing process.
  11. Once flashing completed, your Galaxy S4 mini GT-I9195 will reboot. After the phone resets (it vibrates) IMMEDIATELY hold volume up and home buttons to boot into recovery mode. In recovery use volume keys to navigate between options and Power button to select and option.
  12. Select install zip from sdcard, then select choose zip from sdcard. Now, locate the S4Mini_RootKit_v1.zip file that you copied earlier in Step 2 and select it by pressing Power button. Confirm installation by selecting Yes – Install _____.zip on the next Lcd. The rooting process will begin.
  13. Optional: Flash GT-I9195_Kernel_v1.zip to use a custom stock kernel, which might fix battery drain for some.
Congrats! You just rooted your Galaxy S4 mini GT-I9195 running on XXUBML4 Android 4.2.2 Jelly Bean firmware. To confirm if you successfully rooted your Android device or not install an app called “Root Checker” which is available for free from Google PLAY store. 
Read More..

Wednesday, September 24, 2014

Blackberry Repair RED BLINK EFS CORRUPT on QUALCOM Tool

Read More..

Friday, September 19, 2014

How to Save Battery Life on Sony Xperia S

Sony Xperia S lets you manage power consuming apps with its power saving mode. This feature lets you customize the settings within each power saving mode which suits the way you use your phone. You can turn off handset functions like wi-fi and Lcd brightness right on this power saving mode. Heres how you can activate Power Saver on Sony Xperia S so you can save your devices battery life.

1. On your devices homeLcd, tap on

2. Scroll and tap on Power Saver icon.The Power Saver menu will then be displayed.
3. Tap on the Power Saver option to see the Power Save mode settings menu with the handset functions.
4. On the list, choose which functions you would like to turn on/off when youre on power saver mode.
5. Tap on Done.
6. After youve chosen what functions to turn on/off when on power saver mode, tap on the Power Saver icon to activate it.

Now you have just activated the power saver mode. A power saver icon will then appear at the top of the display. Youll be able to save your phones battery life. To deactivate the power saving mode, follow steps 1 and 2. And tap the icon next to the active power saving mode to turn it off.

Follow also these tips:

• Lessen the Lcd brightness and the Lcd lock timeout.
• Turn down your device volume with the volume keys.
• Close any apps or features when you are done using it so they will not continuously running in the background.
• Turn off the network connection if you are out of range so that your device will stop searching for a network signal. Or you may switch your settings to Airplane mode.
• Shut down your device when you do not use it for a long time.
• You should use the latest version of the software update. Software updates improves some features and fixes some bugs on the previous software version.
Read More..

Saturday, September 13, 2014

Nokia 5530 On of Power Switch Ways Jumper Solution 100 Tested

Nokia 5530 Xpress music power switch Not Working Solution 100% Tested
Read More..

Wednesday, September 10, 2014

How to Download Apps Movies Music Books and Games Using Google Play on Motorola Moto G

Download apps | Google Play™

Get music, movies, books, apps, games, and more.

Find it: Apps >Play Store.

• Find: To search, touch in the top right.

• Download: To download an app you found, touch it to open details and then touch Install, or the price.

• Share: To share an app you found, touch it to open details and then touch Menu > Share.

• Reinstall: To show or reinstall apps you downloaded from Play Store, touch Menu > My Apps.

• Use a computer: To find and manage apps from any computer, go to http://play.google.com using your Google account and password.

There, you can browse apps on the big Lcd, manage your apps across multiple devices (like a phone and tablet), and even set new apps to download to your devices.

• Enjoy music, books & movies:  You can also use Google Play Store to access the “Play Music”, “Play Books”, and “Play Movies & TV” apps.

• Get help: To get help and more, touch Menu in the top right.
Read More..

Saturday, August 30, 2014

How to Add a Shortcut on Sony Xperia Z Homescreen

Just like a desktop, it also works best on any smartphones to add a shortcut on a homescreen. Heres how to do it:

1. On your devices homescreen, touch and hold and empty area until the device vibrates.
2. After doing so, tap on .
3. Then go to Shortcuts and select a shortcut.
4. Or another option, just go directly to the Application screen and touch and hold the application.


Read More..

Tuesday, August 26, 2014

How to Install P605MUBUBMJ5 4 3 Jelly Bean Firmware On SMP605M Galaxy Note 10 1 LTE 2014

Download and install the latest P605MUBUBMJ5 4.3 Jelly Bean Official Firmware on Samsung Galaxy Note 10.1 LTE SM-P605M (2014 Edition). Samsung has just launched the firmware. This new device released by Samsung with Android 4.3 you can JB and this latest update of Android 4.3 Jelly Bean UBUBMJ5 regular firmware. Follow the tutorial below to install the firmware manually via Odin. You can check for the latest firmware available for your device via OTA (over the air) from Settings-About Tablet-Software Update.

As the Galaxy Note 10.1 LTE P605M released with the Android 4.3 Jelly Bean, you can expect few bug fixes and performance enhancements with this latest update. It is always recommended to update your device to the latest firmware available to keep updated with the latest security changes....

If you do not know, Android 4.3 Jelly Bean is equipped with many new features and changes from previous versions of android-like Multi-page feature on the lockscreen, support widget on the lockscreen, Tabbed UI in the Settings, Daydream feature, voice control feature to applications such as tablets, cameras, music players and so on, Hands-free mode, New Notification Panel with 2 pages, ANT + support, TRIM support, camera Repair, Move app to SD feature, New for for Samsung keyboard, Changed the icon for multiple applications for for Samsung, TouchWiz Fine, featuring Adapt, Adapt voice, full-screen mode for for Samsung apps and more.

So, want to update your LTE Galaxy Note 10.1 P605M to UBUBMJ5 latest Android 4.3 Jelly Bean firmware? To install the official way, you can go to the OTA update as mentioned above or download and install the firmware via Samsung Kies utility for. However, if you prefer the manual way to update the official firmware, then follow this article to find step-by-step user guide for Android 4.3 update UBUBMJ5 latest firmware on your Galaxy Note 10.1 LTE P605M via Odin.


Important Note:


"The firmware is released only for the Samsung Galaxy Note 10.1 LTE SM-P605M model, so don’t try this in any other android device. Check your device model number from Settings-About Tablet. Also the tutorial is based on Windows PC. Follow all the pre-requisites, procedures and steps carefully to avoid breaking your Tablet".


Android 4.3 Jelly Bean P605MUBUBMJ5 Official Firmware Download List

Samsung rolled out the firmware for the following countries. The firmware which are unbranded or not locked to any carrier, no matter of which country or region, can be flashed on any Galaxy Note 10.1 LTE SM-P605M model.
[Firmware for rest of the countries and carrier will be added here when available]


More Recent Firmware Build


Pre-Requisites:

Check battery percentage, your device should have at least 90% battery power
Turn on USB Debugging mode, go to Settings-Developer Options-USB Debugging
Backup important data and settings to external storage follow this guide
Install USB driver for your device on your computer- Download Samsung USB Driver


Points to be noted:
  • If you are using any Custom ROM such as- CyanogenMod, Paranoid Android, AOKP, SLIM ROMs etc, then it’ll replaced by this official Stock ROM
  • Custom Recovery (CWM or TWRP Recovery) will be replaced by Stock Recovery
  • After flashing official firmware, your device will no longer belongs to rooted device. However you can root your device any time after flashing the firmware.
All the above pre-requisites are very important and must follow before proceed to installation guide. Hope you get all the above points. Now, go through the below tutorial to install Android 4.3 P605MUBU
BMJ5 official firmware on Galaxy Note 10.1 LTE P605M.

How to Install Android 4.3 Jelly Bean Official Firmware on Galaxy Note 10.1 LTE P605M through Odin:

  1. Download Android 4.3 UBUBMJ5 Firmware for Galaxy Note 10.1 LTE P605M from the above list
  2. Download Odin 3.07
  3. Switch off your Tablet and boot Galaxy Note 10.1 LTE P605M into Download Mode by pressing and holding the Volume Down and Power keys together until you get the warning message, now press Volume Up key to proceed to Download Mode.
  4. Extract the downloaded Odin3.07 zip file and run the Odin3 v3.07.exe file as an administrator (Right click on the .exe file and click on Run as administrator)
  5. Now connect your Galaxy Note 10.1 LTE P605M to your computer via USB cable
  6. In Odin3 screen, you should see a COM Port number like “0:[COM7]” at ID:COM section and “Added!” text at the message box. This means your device has been detected by Odin3.
  7. Make sure that, only the “Auto Reboot” and “F. Reset Time” options are checked.
  8. Now, extract the downloaded firmware zip file, you’ll find a firmware file with extension.tar.md5
  9. In Odin screen, click on PDA button (if you are using the latest Odin Version, then click on AP button instead of PDA) and select the firmware file with .tar.md5 extension (The firmware file look something like: P605MXXDLJ5_P605MODDDLI7_INU.tar.md5)
  10. Now, click on the Start button to begin the installation process, wait few moments.
  11. Once completed, you would see “PASS!” message in ID:COM port having green background
  12. Your Tablet should automatically reboot after completion
  13. You can now disconnect your Tablet from computer
  14. Finish
Thats all for updating firmware official Android 4.3 Jelly Bean on the Galaxy Note 10.1 LTE BC-P605M. Hope you get all the above points and successfully completed the tutorial. If you follow everything as mentioned in the tutorial above, then you P605M LTE Galaxy Note 10.1 should now be running on Android 4.3 Jelly Bean version UBUBMJ5 latest build. You can verify the details of the firmware update from Settings-About Tablet. If you have any questions or problems with the download link, do not hesitate to contact with us and do not forget to share your thoughts in the comments below.
Read More..

Monday, August 11, 2014

How To easy Root KENEKSI Beta Running On Android 4 0 4 ICS

Beta Keneksi Easily Root without using a PC but just using your mobile device. Yes! You can now root your Beta KENEKSI that running on the latest official firmware by installing an app and following very simple steps. You do not need any PC or computer. By rooting your device you can enjoy various additional benefits that your device can not offer stock....

Once you eradicate Beta KENEKSI well you can take advantage of hardware as you want. This Android-powered device comes with an impressive portfolio of hardware that you can use to its full potential once you root KENEKSI Beta. You can overclock, can install root only apps, you can access and modify the file system, can even upgrade to a better version of Android such as Android 4.3 or Android 4.4 Jelly Bean KitKat with flashing custom ROMs (if available) if you have custom recovery installed. You can followthis simple instructions to find and install a custom recovery (CWM recovery or TWRP recovery) on your device. See also: Benefits of Rooting Android Devices


DisclaimerThis guide is for educational purpose only. Neither True-Android team nor any developers are responsible if your device bricked after following this tutorial. Remember, rooting void your device manufacturer warranty.

Pre Requisites:

1. Backup your device data.

2. Make sure your device have at least 60% battery power. You can install an app like Battery Notifier BT Free on your Android device to check it easily.

Hope you back up all your data and settings as mentioned above. So, its time to jump into next stage of this guide.

How To root KENEKSI Beta Easily

Step 1: Download Framaroot and install it (open a file explorer, navigate your download and tap on it; you can also directly open the apk from browser download section to install it). If you see a warning box then you require to check Unknown sources under Settings –> Security.

Step 2: Open the app and then tap on install superuser or super SU of your choice.

Step 3: You will see some rooting options. Tap on any of the available rooting method and soon youll see the success.

To confirm if you successfully rooted your Android device or not install an app called “Root Checker” which is available for free from Google PLAY store.

That’s it! You just learn how to root KENEKSI Beta. And, that’s too without using any computer. You can fill the comment form below to ask additional help from community.
Read More..

Crew RKTablets Genio CM10 1 v1 3 3 firmware installed on Pipo S1 tablet


1. Backup your data.
2. Download the CM10.1 archive from here, here or here; extract PipoS1_CM10.1_v1.3.3.rar. Copy Oma RK30 CM10.1 Format NAND.zip file to a microSD card.
3. Hard-off the tablet by long pressing the power button (4+ seconds). Insert microSD card. Hold down the VOL- button while inserting microUSB cable to enter download mode
4. Start the RKAndroidTool.exe found in the RKDevelopTool_v1.35 folder (right-click, run as administrator). NOTE: The tool should say Found RKAndroid Loader Rock Usb. Hit EraseIDB and wait for success (Clears partition table) and then hit Run once. INFO: Run OK, Pipo S1 will boot into recovery --> **RECOVERY SHOULD BE v6.0.3.1**
5. Wipe cache, Wipe data/factory reset, Install zip from external card Oma RK30 CM10.1 Format NAND.zip and reboot. Wait 5 minutes.
6. Once the tablet starts, select your prefered launcher, hit immer (always).
7. Set the language to English: Hit the setting icon, Systemeinstellungen, Scroll down to Sprache & Einabe, Set Sprache to your desired language.
8. Fix landscape menu buttons not appearing. Go to play store, sign in. Install Textdroider DPI from play store. Set DPI to 120. Apply. Reboot. HINT: to use back & navigate button use the tablet in portrait mode.
9. Optional: If you want back the tablet interface with bottom notification bar then download TabletUI fix v1.3.2 and install it from microSD card via CWM.


Whats new:
- a2dp fixed
- gapps updated

 Hints:
- enable development options > tap 5 times on build number
- higher performance > disable animation scales in developer options
- control Play-Store > disable auto-updates
- battery drain > set keep wi-fi on during sleep to never
- full access to the build > enable /system rw in File Manager HD
- load kernel modules > enable init.d ON in Pimp my Rom (reboot)
- dont show su notifications > disable in Superuser

Unresolved Issues:
- Wifi takes a few seconds to connect from sleep
- camera is upside down
- display artifacts on screen rotation

Troubleshooting:
Problem: If you get stuck with installs the loop you back to recovery constantly, you probably have CWM-based Recovery v6.0.1.5. This recovery does not work with the original Pipo S1 kernel.
How to Fix problem: Use recovery 6.0.3.1 with kernel RK3-_kernel_308_s1_pipo

Problem: You find yourself stuck in recovery with no way to power off
How to Fix problem: Select a menu item, highlight ++++Go Back++++, when you press the power button, do not let go until tablet powers off.


Build details:
- CyanogenMod 10.1 / Android Jelly bean 4.2.2
- Kernel 3.0.8+
- this firmware has root acces.
- Languages: all
- gapps are preinstalled
- Another preinstalled apps: AdAway, Apollo, CPU Tweaks, DSP Manager, File Manager HD, MX Player, Nova Launcher, Pimp My Rom, RebootMenu, Terminal Emulator, USB Host Controller, Viper4Android FX, etc...
- Antutu Benchmark score: about 10.000 points at 120 dpi;
- Build number: Oma RK30 CM10.1 v1.3.3 - 23.10.2013
Credits for this great ROM goes to Oma.
Credits for this tutorial goes to trenchtractor.
Always keep in mind that this is not a review, just a first sight of this firmware. You have to test it more for another details, to see if it satisfies your needs.Be aware: it is your own risk! 
Read More..