Showing posts with label lg. Show all posts

Thursday, November 6, 2014

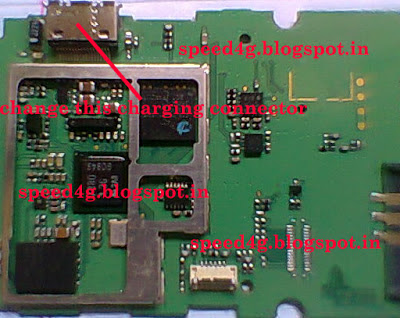
LG 106B KEYPAD PROBLEM

Lg 106b keypad problem first clean charging port complaint remaining change charging connector
Read More..

Sunday, November 2, 2014

LG Mobile Phone Secret Codes

LG

LG all models test mode:

  • Type 2945#*# on the main screen.
  • 2945*#01*# Secret menu for LG
  • IMEI and SW (LG 510): *#07#
  • Software version (LG B1200): *8375#
  • Recount cheksum (LG B1200): *6861# 
  • Factory test (B1200): #PWR 668 
  • Simlock menu (LG B1200): 1945#*5101# 
  • Simlock menu (LG 510W, 5200): 2945#*5101#
  • Simlock menu (LG 7020, 7010): 2945#*70001# 
  • Simlock menu (LG 500, 600): 2947#*

LG-U81XX SPECIAL CODES:

Code to read phone version : 

- Phone without SIM
- Enter 277634#*# or 47328545454#
- Select SW Ver.infoCode to reset phone : 

- Phone without SIM
- Enter 277634#*# or 47328545454#
- Select Factory ResetCode to enter UNLOCK MENU : 

- Phone wit SIM inside
- Enter 2945#*88110#
Test Menu 8330 : 637664#*#
Test Menu 8180 V10a: 49857465454#
Test Menu 8180 V11a: 492662464663#
Test Menu 8130-8138: 47328545454#
Test Menu 8110-8120: 277634#*
Read More..

Wednesday, October 29, 2014

How to Hard Reset LG GT540

Below is the method on how to hard reset LG GT540. Use this method when you want to clear all settings, to wipe out all the data from phone, to get rid of viruses or malware application, to speed up your device .
(Warning! When you do a full reset, your LG Smartphone returns to its default settings and looses all data that is stored in your phone.  Do not forget to back up any important data before performing a factory reset.)

To perform a hard reset follow this easy steps
1) Power on your phone.
2) Press volume up button + home button + search button at the same time for 5 seconds
    (see the image below for the buttons location)
3) A message will appear " Are you sure you want to factory reset?"
5) Press yes and wait for phone to restart.
6) Youve done resetting your GT540.
Read More..

Thursday, September 18, 2014

LG Lucid 2 Tips and Tricks

How to Factory Reset (Hard Reset) LG Lucid 2

We have our own reasons why we factory reset our device. Maybe we want to delete all the files and restore the device to its original state. It could also be the device may be malfunctioning or so slow and it needs to be reset.

Restoring the default settings or factory reset your LG Lucid 2 will delete all your existing files. It is recommended to backup your important files on your computer before attempting to reset your device.

The steps below are the instructions on how to factory reset your LG Lucid 2:

Step 1. On your HomeLcd, tap on MENU icon.

Step 2. Select Settings, then select Backup & Reset option.

Step 3. Under Personal Data, tap on Factory Data Reset.

Step 4. Read warning carefully before tapping the Reset phone.

Step 5. If you want to proceed in resetting your device, tap on Erase Everything to confirm the Factory Reset.


Now, you just need to wait while your device is resetting. It should reboot itself and you will have a new start on your LG Lucid 2.

If your LG Lucid 2 is unresponsive, then you may need to do the Hard Reset.

  • Press and hold the Power button/Lock Key and Volume Down Key at the same time. 
  • Hold these buttons until you see the Factory Hard Reset.
  • Press the Power Key continue or the Volume Keys to cancel.
  • Press the Power Key again to confirm the factory reset, or the Volume Keys to cancel.
  • Wait for a few minutes while your phone performing the hard reset. It will turn on in a while..


How to Extend Battery Life of LG Lucid 2

Battery Life depends on how you use your device. For LG Lucid 2 device, if you want to save your battery to last longer hours, you may need to adjust your settings. Follow these suggestions:


• Monitor what uses your phone battery. .

- On your HomeLcd, tap on the Application tab > then select Settings > About phone > Battery use.

• Lessen the Lcd brightness and the Lcd lock timeout.

• Turn down your device volume with the volume keys.

• Close any apps or features when you are done using it so they will not continuously running in the background.

• Turn off the network connection if you are out of range so that your device will stop searching for a network signal.

• You should use the latest version of the software update. Software updates improves some features and fixes some bugs on the previous software version.

• Turn off the camera flash.

• The camera viewfinder can be a power drain, so after youve finished taking photos.


How to Turn On and Connect to Wi-Fi on LG Lucid 2

The steps below will let you show how to connect to a wi-fi network whenever youre out of range. However, if you want to connect to a secured network, you may need to obtain the networks password. Heres how to connect to a wi-fi network on LG Lucid 2.

1. On your Home Lcd, tap on the Applications tab.

2. Then select Settings.

3. Choose Wireless & Networks, then Wi-Fi settings.

4. Tap Wi-Fi to turn it on and it will begin scanning for available Wi-Fi networks.

5. There should a list of available Wi-Fi networks will be displayed. If it is secured, then it has a locked icon.

6. Touch on the network to you want to connect.

7.  If the network is not secured, then confirm by tapping Connect.

8. If the network is secured, then enter the password then tap Connect.

The status bar displays icons that indicate Wi-Fi status.


How to Uninstall Apps on 
LG Lucid 2

There will come a time that you no longer want to play the app that you have downloaded and want to remove it from your phone (LG Lucid 2). If this time will come, you just need to uninstall or disable the app so it will be removed on your phone. 

Uninstalling apps is also necessary if you have less than 10% of space available on your memory, since your phone cannot receive new messages.

Follow these steps on how to uninstall your apps.

  • Tap on .
  • Select Apps tab, then Settings.
  • Then choose Application Manager.
  • Once all applications appear, scroll to and select the application you want to uninstall.
  • Tap Uninstall.


How to Share Your Data Connection Using USB

By the Mobile Broadband Connect feature on your LG Lucid 2, you can share the phones mobile data connection using a USB.

1. In the Application list, select Settings.

2. Then tap on More.

3. From the Tethering & Networks tab, tap Mobile Broadband Connect.

Note: This setting is greyed out if not connected via USB. 

When your phone is sharing its data connection, an icon appears in the status bar and as an ongoing notification in the notifications drawer.

Read More..

Tuesday, September 16, 2014

LG kg270 All hardware solution

Read More..

Monday, September 1, 2014

LG Revolution VS910 Factory Reset Procedures

LG Revolution VS910 Factory Reset Procedures - LG Revolution sports a 4.3” TFT electrical phenomenon touchscreen with 480 x 800 pixels resolution, Multitouch support, accelerometer device, Proximity device, and Compass device. This phone runs on android OS v2.2 (Froyo) which can be upgraded to v2.3 (Gingerbread). For the hardware, it uses 1 ghz Scorpion processor and Adreno 205 GPU.

ResetLGRevolutionVS910_thumb

LG Revolution VS910 Factory Reset Procedures

Caution: If you perform a factory reset, all user applications and user data will be deleted. Please remember to back up any important data before performing a factory reset. Reset your LG Revolution VS910 as follows:

  1. Turn the power off.

  2. Touch and hold the following keys at the same time for 12 seconds:Power/Lock Key + the down Volume Key.

  3. Release the keys when you see the screen message "Permanently Erase
    User Data & Reset Settings
    ?, press the Power Key to confirm and any other key to cancel.

  4. Press the Power/Lock Key to confirm (or press any other key to cancel). When you press the Power/Lock Key to confirm, a pop-up appears asking "Are you sure you want to continue with erase?".

  5. Press the Power/Lock Key and your phone will be restored to the factory settings. To cancel, press any other key.
Read More..

How To Update LG G Pad 8 3 V500 To Android 4 4 2 KitKat via CM11 Nightly

You can now update your LG V500 G Pad 8.3 for the latest and customized Android 4.4.2 KitKat. Google has just introduced Android 4.4.2 Nexus KitKat many models but builds are not many that are adjustable. The CyanogenMod team has just introduced Android 4.4.2 CM11-based KitKat build for LG V500 G Pad 8.3. You can download and install a custom firmware on the LG G CM11 Pad V500 8.3. Because, LG G Pad V500 8.3 capable enough to smoothly run Android 4.4.2 KitKat, CM11 will be a great experience for you. By building a night you will receive daily updates and bugs fixed faster and features introduced regularly. To learn how to flash this ROM, continue reading this guide to find out how to install Android 4.4.2 custom ROM based KitKat CM11 LG G Pad V500 8.3.


Most of the Android 4.4.2 KitKat nice features that you will enjoy is the Screen Recording, Click to Pay (Google Wallet to all people), NFC emulation for non-NFC devices, 14% use less memory, cloud printing from the gallery, is the Google Home new Launcher, core System process use, efficient and responsive applications on all devices, the memory usage of all the new tool procstats details, Immersive full-screen mode, the changes in the resolution for smooth media playback, phone dialer gets local businesses detection, Quickoffice redesigned and much more.
As said already, this is a test build and you should expect some bugs in it. All bugs and problems are expected to remain as the construction progress toward a better build.

Pre Requisites:
1. Backup your device data
2. Make sure your device have at least 60% battery power. You can install an app like Battery Notifier BT Free on your Android device to check it easily.
3. You already have USB Driver Installed for LG G Pad 8.3 V500 in your PC. Download USB Drivers
4. Make sure USB Debugging is enabled otherwise you won’t able to transfer file between PC and LG G Pad 8.3 V500.
5. Your device have latest ClockworkMod Recovery Installed.
If you done everything that we mentioned above then you are ready to follow step-by-step guide on how to install Android 4.4.2 KitKat based CM11 ROM on LG G Pad 8.3 V500.

File Required(Download by clicking on it)
  1. CM11 For LG G Pad 8.3 V500  [Filename: cm-11-20131221-NIGHTLY-v500.zip]
  2. Google Apps [Filename: gapps-kk-20131119.zip]
Warning!
This tutorial is only for LG G Pad 8.3 V500. Don’t try this guide on any other Android device. Also, we are not responsible for any damage caused due to the instruction given in this page. Try this at your own risk. However, it is very unlikely that your device will be damaged if you follow all the instructions as it is which are mentioned in procedure.

How to Install Android 4.4.2 KitKat based CM11 ROM on LG G Pad 8.3 V500 

  1. Connect your device to PC using USB cable and then copy downloaded files to the SD card of your device.Important: Don’t extract any files. 
  2. Disconnect USB and then turn off your LG G Pad 8.3 V500. 
  3. Boot into recovery mode. and then use following command in command prompt after connecting the device: adb reboot recovery. 
  4. Perform a Nandroid backup of your existing ROM that you can restore later if this new ROM not work or you want to go back into your previous ROM. To perform a backup, select Backup and Restore, then on the next screen, select Backup again. Go back to main recovery menu after backup is complete. 
  5. Now, perform data wiping task. To do so, select wipe data/factory reset, then select Yes on next screen to confirm your action. Wait few minutes till the data wipe is complete. Now come back to CWM recovery main menu. Select wipe cache partition and after wiping process done, select Wipe Dalvik Cache under advanceoption to perform Dalvik cache wiping. 
  6. Select install zip from sdcard, then select choose zip from sdcard. Now, locate the CM11 Zip file that you copied earlier in Step 1 and select it by pressing Power button. Confirm installation by selecting Yes – Install _____.zip on the next screen. The ROM installation will begin. 
  7. Once the ROM installation process end, repeat the step 6 but choose the gapps-kk-20131119.zip file instead of ROM zip to install the Google apps package. 
  8. When installation is completed, go back to the main recovery menu and select reboot system now to reboot your LG G Pad 8.3 V500 and boot up into Android 4.4.2 KitKat ROM CM11. 
  9. Returning to Previous ROM: To go back to your previous ROM, boot into recovery, select backup and restore then restore your previous ROM by selecting it from the list.
    Congrats! Android 4.4.2 KitKat firmware based custom ROM CM11 is now installed and running on your LG G Pad 8.3 V500. [Note: Root is turned off by default in CM ROMs, you must enable developer settings first (tap the build number 8 times under about device), then enable root under Developer Settings
    Read More..

    Get LG Optimus G E970 AT T install Android 4 4 2 KitKat PAC man ROM Instant How To Guide

    LG Optimus G E970 (AT&T) can be updated to latest Android 4.4.2 KitKat. The upgrade is possible with the help of custom ROM PAC-man. The development team of PAC-man ROM finally introduced Android 4.4.2 KitKat based PAC-man ROM for LG Optimus G E970 (AT&T). Which means, you can download and install custom firmware PAC-man to update your LG Optimus G E970 (AT&T) to latest Android 4.4.2 KitKat. LG Optimus G E970 (AT&T) comes with good hardware spec, hence is capable to run PAC-man smoothly. PAC-man ROM consist various features of Paranoid Android, AOKP and CyanogenMod. The link Im sharing is PAC-man nightly build. The good thing about nightly build is, you will receive update daily and bugs are fixed faster as well as new feature introduced regularly. Continue reading this guide to know how to install Android 4.4.2 KitKat based PAC-man custom ROM on LG Optimus G E970 (AT&T).
    PAC-man comes with various useful customization. Since, PAC-man is based on Android 4.4.2 KitKat, you may like to know whats new on it. Some of the cool Android 4.4.2 KitKat features that you will enjoy is Screen Recording, Tap to Pay (Google Wallet for everyone), NFC emulation for non nfc devices, 14% less memory usage, cloud printing from Gallery, Google Home is the new Launcher, Core System Processes Trimmed, apps are efficient and responsive on all devices, the all new procstats tool details memory use, Full-screen Immersive mode, seamless change in resolution during media playback, Phone dialer got local business detection, redesigned Quickoffice and many more.

    Please note, not all Android 4.4.2 KitKat feature yet ported to PAC-man ROM.

    Another thing you should note, this is nightly build, hence expect some bugs in it. All bugs and issues expected to be fixed as development progress towards a stable PAC-man build.
    Warning!
    This tutorial is only for LG Optimus G E970 (AT&T). Don’t try this guide on any other Android device. Also, we (Android Pulp Team) are not responsible for any damage caused due to the instruction given in this page. Try this at your own risk. However, it is very unlikely that your device will be damaged if you follow all the instructions as it is which are mentioned in procedure.  
    Pre Requisites:
    1. ROM flashing require you to wipe your internal memory data, hence you required to backup your device data. You can follow our ultimate backup guide.
    2.  Make sure your device have at least 60% battery power. If your phone shut down during installation then there is good chance to brick your device.You can install an app like Battery Notifier BT Free on your Android device to check it easily.
    3. You must have USB Driver Installed for LG Optimus G E970 (AT&T) in your PC. [Download USB Drivers]
    4. Make sure USB Debugging is enabled otherwise its wont be possible to transfer file between PC and LG Optimus G E970 (AT&T). [Guide].
    5. Your device have latest CWM version 6.0.4.4 and up or TWRP 2.6.3.1 and up installed. [General Guide]
    If you done everything that we mentioned above then you are ready to follow step-by-step guide on how to install Android 4.4.2 KitKat based PAC-man ROM on LG Optimus G E970 (AT&T).
    File Required(Download by clicking on it)
    1. PAC-man For LG Optimus G E970 (AT&T)  [Filename: pac_e970-nightly-20140514.zip]
    2. Google Apps [Filename: pa_gapps-stock-4.4.2-20140207-signed.zip]
      Read Also :Android 4.4.2 KitKat PAC-man ROM Install For LG Optimus G E973 (Canada) 
    How to Install Android 4.4.2 KitKat based PAC-man ROM on LG Optimus G E970 (AT&T)
    1. Connect your device to PC using USB cable and then copy downloaded files to the SD card of your device. Important: Don’t extract any files.
    2. Disconnect USB and then turn off your LG Optimus G E970 (AT&T).
    3. Now, boot into recovery mode. To do so, press and hold Volume Up & Power until fastboot screen appears, then press Volume Down twice, then press Power to boot recovery [use volume buttons to scroll and Power button to select]. Alternatively try this: Recovery Mode without Key Combination.
    4. Perform a Nandroid backup of your existing ROM that you can restore later if this new ROM not work or you want to go back into your previous ROM. To perform a backup, select Backup and Restore, then on the next screen, select Backup again. Go back to main recovery menu after backup is complete.
    5. Now, perform data wiping task. To do so, select wipe data/factory reset, then select Yes on next screen to confirm your action. Wait few minutes till the data wipe is complete. Now come back to CWM recovery main menu. Select wipe cache partition and after wiping process done, select Wipe Dalvik Cache under advance option to perform Dalvik cache wiping.
    6. Select install zip from sdcard, then select choose zip from sdcard. Now, locate the PAC-man Zip file that you copied earlier in Step 1 and select it by pressing Power button. Confirm installation by selecting Yes – Install _____.zip on the next screen. The ROM installation will begin.
    7. Once the ROM installation process end, repeat the step 6 but choose the pa_gapps-stock-4.4.2-20140207-signed.zip file instead of ROM zip to install the Google apps package.
    8. When installation is completed, go back to the main recovery menu and select reboot system now to reboot your LG Optimus G E970 (AT&T) and boot up into Android 4.4.2 KitKat ROM PAC-man. 
    9. Returning to Previous ROM: To go back to your previous ROM, boot into recovery, select backup and restore then restore your previous ROM by selecting it from the list.
    Tutorial For TWRP Recovery Users:
    1. Connect your device to PC using USB cable and then copy downloaded files to the SD card of your device. Important: Don’t extract any files.
    2. Disconnect USB and then turn off your LG Optimus G E970 (AT&T).
    3. Now, boot into recovery mode. To do so, press and hold Volume Up & Power until fastboot screen appears, then press Volume Down twice, then press Power to boot recovery. Alternatively try this: Recovery Mode without Key Combination.
    4. Create a Backup using TWRP Backup Option.
    5. Perform a Factory Reset (this will delete all apps and their settings and game progress). To do this, Tap on Wipe, then at the bottom of the screen do a Swipe on the ‘Swipe to factory reset‘ option.
    6. Now its time to add zip file for flashing. Tap on Install, then browse to the location where you saved the files and tap on the PAC-man Zip file. Then tap on Add More Zips, and add pa_gapps-stock-4.4.2-20140207-signed.zip. Now at the bottom of the screen, do a swipe on the Swipe to confirm flash option to begin flashing.
    7. When installation is completed, go back to the main recovery menu and tap on Reboot and then, tap on System to reboot your LG Optimus G E970 (AT&T) and boot up into Android 4.4.2 KitKat ROM PAC-man.
    8. Returning to Previous ROM: To go back to your previous ROM, boot into recovery, select Backup then through Restore option, restore your previous ROM by selecting it from the list.
    Congrats! Android 4.4.2 KitKat firmware based custom ROM PAC-man is now running on your LG Optimus G E970 (AT&T). Now explore the latest Android 4.4.2 KitKat. [Note: If you find difficulties to run root only apps then it may be disabled. Do this then, enable developer settings first (tap the build number 8 times under about device), then enable root under Developer Settings].
    Read More..

    Monday, August 11, 2014

    LG RD 6100 LG RD 6000 USB Not Recognized 1000000 Solution


    Read More..